# Quick start
Markdown version of .
Run Immich Memories beside your existing Immich server, then make a short film from one album.
**Start with Basic if you are unsure.** It makes a complete film on a CPU. Choose GPU if you have
an NVIDIA GPU and want picture descriptions, and Full if you also run a text reader.
You can switch tiers later.
| Tier | What you get | What you need |
| - | - | - |
| **Basic** | A complete film with titles and bundled music, up to 1080p | 2 CPU cores, 4 GiB RAM for the app |
| **GPU** | Basic plus picture descriptions and extra selection and sharing checks | NVIDIA GPU, driver and Container Toolkit; room for the app and model services |
| **Full** | GPU plus a text reader that refines the draft | The GPU setup and a reader server with a 32k context window |
All three need Docker Compose v2, an Immich library and an API key, on Immich 2.7.5 or later (v2)
or 3.2.4 or later (v3). Older v3 releases have security holes Immich has since fixed. Allow about
25 GB for app data plus 0.35 GB per 1,000 pictures and videos, plus the images, model caches and
finished films. GPU and Full give the app an 8 GiB limit, and the model services need memory on
top. Check the [tier requirements](https://sam-dumont.github.io/immich-memories/docs/run/requirements.md) if you are choosing hardware.
**Other platforms:** [Synology Container Manager, with screenshots](https://sam-dumont.github.io/immich-memories/docs/run/platforms/synology.md),
[Unraid, TrueNAS and Portainer](https://sam-dumont.github.io/immich-memories/docs/run/nas.md),
[native Mac or Linux](https://sam-dumont.github.io/immich-memories/docs/run/uv-pip.md), [Kubernetes](https://sam-dumont.github.io/immich-memories/docs/run/kubernetes.md).
Apple Silicon uses the native install for GPU and Full. For a NAS with a separate GPU machine,
use the [setup builder](https://sam-dumont.github.io/immich-memories/setup/) and its GPU box option.
## 1. Download the files
Choose the tab for your tier. Run its commands in a new folder, separate from your Immich install.
The files match the release shown on this docs site.
**Basic tab:**
**Download Basic installation files (v1.0.0):**
```bash
mkdir -p immich-memories && cd immich-memories
curl -fLO "https://github.com/sam-dumont/immich-memories/releases/download/v1.0.0/docker-compose.yml"
curl -fLO "https://github.com/sam-dumont/immich-memories/releases/download/v1.0.0/example.env"
cp example.env .env
sed -i.bak 's/^IMMICH_MEMORIES_VERSION=.*/IMMICH_MEMORIES_VERSION=1.0.0/' .env && rm .env.bak
```
This starts one app container. No GPU or separate model server is needed.
**GPU tab:**
**Download GPU installation files (v1.0.0):**
```bash
mkdir -p immich-memories && cd immich-memories
curl -fLO "https://github.com/sam-dumont/immich-memories/releases/download/v1.0.0/docker-compose.yml"
curl -fLO "https://github.com/sam-dumont/immich-memories/releases/download/v1.0.0/example.env"
curl -fLO "https://github.com/sam-dumont/immich-memories/releases/download/v1.0.0/docker-compose.gpu.yml"
curl -fLO "https://github.com/sam-dumont/immich-memories/releases/download/v1.0.0/docker-compose.cuda.yml"
cp example.env .env
sed -i.bak 's/^IMMICH_MEMORIES_VERSION=.*/IMMICH_MEMORIES_VERSION=1.0.0/' .env && rm .env.bak
sed -i.bak 's/^TIER=.*/TIER=gpu/' .env && rm .env.bak
echo 'COMPOSE_FILE=docker-compose.yml:docker-compose.gpu.yml:docker-compose.cuda.yml' >> .env
```
This starts the app, CUDA inference and a caption server. The caption weights download on the
first start. The commands set `TIER` and the NVIDIA override in `.env` for you.
**Full tab:**
**Download Full installation files (v1.0.0):**
```bash
mkdir -p immich-memories && cd immich-memories
curl -fLO "https://github.com/sam-dumont/immich-memories/releases/download/v1.0.0/docker-compose.yml"
curl -fLO "https://github.com/sam-dumont/immich-memories/releases/download/v1.0.0/example.env"
curl -fLO "https://github.com/sam-dumont/immich-memories/releases/download/v1.0.0/docker-compose.gpu.yml"
curl -fLO "https://github.com/sam-dumont/immich-memories/releases/download/v1.0.0/docker-compose.full.yml"
curl -fLO "https://github.com/sam-dumont/immich-memories/releases/download/v1.0.0/docker-compose.cuda.yml"
cp example.env .env
sed -i.bak 's/^IMMICH_MEMORIES_VERSION=.*/IMMICH_MEMORIES_VERSION=1.0.0/' .env && rm .env.bak
sed -i.bak 's/^TIER=.*/TIER=full/' .env && rm .env.bak
echo 'COMPOSE_FILE=docker-compose.yml:docker-compose.gpu.yml:docker-compose.full.yml:docker-compose.cuda.yml' >> .env
```
This starts the GPU services and selects Full. In `.env`, also set your reader connection:
```ini
READER_ENABLED=true
READER_URL=http://192.168.1.50:8000/v1
READER_MODEL=your-server-model-name
READER_API_KEY=
```
Use the exact model name served by your reader. Fill in its API key if it requires one.
The reader needs a 32k context window. [Set up a reader](https://sam-dumont.github.io/immich-memories/docs/better/reader.md) if you do not have
one yet. It receives annotation text, including people and place names; choose a local server
if that text should stay on your network.
Prefer filled-in files or a stack editor? Use the [setup builder](https://sam-dumont.github.io/immich-memories/setup/).
## 2. Connect Immich
In Immich, open **Account Settings → API Keys → New API Key**. Leave **All** unchecked and
select these ten read permissions:
`user.read`, `asset.read`, `asset.statistics`, `asset.view`, `asset.download`,
`face.read`, `person.read`, `person.statistics`, `album.read` and `map.search`.
For a larger library, optional `tag.read` finds previously generated films through the tag index
instead of checking video tags individually. The [API-key guide](https://sam-dumont.github.io/immich-memories/docs/run/docker.md#the-api-key)
lists the other optional read and upload permissions.
Copy the key. Open `.env` and fill in:
```ini
IMMICH_URL=http://192.168.1.10:2283
IMMICH_API_KEY=your-api-key-here
TZ=Etc/UTC
```
Use an Immich address the container can reach. `localhost` means the container itself.
Set `TZ` to your timezone. [Upload permissions](https://sam-dumont.github.io/immich-memories/docs/run/docker.md#the-api-key) can wait until
you want to send films back.
Create the folder for finished films, give the app permission to write there and protect `.env`:
```bash
mkdir -p output
sudo chown 1000:1000 output
chmod 600 .env
```
Keep `.env` with your backups. On Synology, use the
[folder permission recipe](https://sam-dumont.github.io/immich-memories/docs/run/nas.md#the-output-folder) in place of `chown`.
### Open the app from another computer
The app asks for a sign-in. With nothing configured, the first start generates a password
(step 4 says where to read it). This is the Immich Memories login, separate from your Immich account.
For access from another computer on your trusted LAN, also set this in `.env` **before starting**:
```ini
UI_BIND_ADDRESS=0.0.0.0
```
To choose your own login instead of the generated one, add these two lines as well, with a
password of at least 12 characters:
```ini
IMMICH_MEMORIES_AUTH_USERNAME=admin
IMMICH_MEMORIES_AUTH_PASSWORD=replace-with-your-own-long-password
```
This setup uses HTTP on your trusted LAN. On your own desktop, keep the default localhost binding.
## 3. Start the app
```bash
docker compose up -d
```
The first start pulls the container images. GPU and Full also wait for the caption weights
and the service health checks before starting the app, so let the command finish. Later starts
reuse the downloaded files.
## 4. Open the app and download models
- **On this computer:** open .
- **From another computer:** open `http://your-server-address:22830`, using the Docker host's LAN address.
Sign in. If you set no login of your own, the username is `admin` and the generated password is
in the container log: run `docker compose logs immich-memories` and look for the line with the
username and password. Write it down: later starts do not print it again. Lost it? See
[the generated password](https://sam-dumont.github.io/immich-memories/docs/run/authentication.md#the-generated-password).
Open **Memory**. In the **Download models** card, review the files and press **Download models**.
The card disappears when the required files are ready. They download once and stay in the app's
data volume; if they are already there, there is no card.
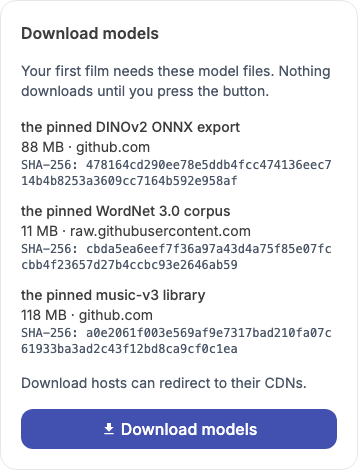
Basic is shown above. GPU and Full list more files.
### GPU and Full: check the model services
The app's download card covers its local model files. GPU and Full also run model services,
which can still be downloading weights. Before the first film, check those services from the
installation folder:
```bash
docker compose exec -T immich-memories immich-memories preflight
```
Continue when Immich, required models and output checks pass, along with GPU inference, captions
and the Laya family-viewing check. Full also needs the reader check to pass.
Follow the fix beside any failed check.
[Read preflight results](https://sam-dumont.github.io/immich-memories/docs/reference/installation-help.md#read-preflight) if you are unsure.
### Make your first film
Choose an album of 20–50 pictures, review the cut, then render.
[Your first film](https://sam-dumont.github.io/immich-memories/docs/get-started/first-film.md) walks through it on Basic, GPU and Full.
Prefer the terminal for model downloads? See
[Download models from the CLI](https://sam-dumont.github.io/immich-memories/docs/reference/installation-help.md#download-models-from-the-cli).
## If it stops
[Installation help](https://sam-dumont.github.io/immich-memories/docs/reference/installation-help.md) covers connection errors, missing models,
ports, permissions and Docker networking. [Tested deployments](https://sam-dumont.github.io/immich-memories/docs/run/tested-deployments.md)
records which versions and platforms have been exercised.